Easily install peel and stick wallpaper to add beauty and personality to your space on a budget.
After spending days removing layers of wallpaper in most of the rooms of our fixer upper…I can honestly say I was anti-wallpaper.
The old wallpaper never peeled off easily, the drywall ended up damaged…and any missed spots of leftover glue interfered with the new paint.
So friends, the wallpaper aversion was strong.
BUT, as much as I dislike the removal, who can deny the beauty of wallpaper? I really do love the look for an accent wall, and how it makes such a statement in a small space. I just wanted the fun…without the mess. Post contains affiliate links.
Peel and Stick Wallpaper?
After seeing gorgeous home decor projects using peel and stick wallpaper, I started to get curious.
I always thought of peel and stick wallpaper as a temporary option designed for rentals…but I learned that is not the case! While it is easy to remove if needed, it is also durable and lasting just like traditional wallpaper.
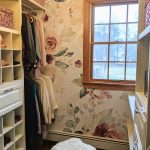
The more I heard about peel and stick wallpaper, the more I wanted to give it a go! So, I bought this pink floral wallpaper from Roomates to try out on our $100 laundry room makeover.

It turned out even better than I hoped, and I am officially no longer terrified of wallpaper…well at least the peel and stick variety!

I had a few concerns about installing wallpaper in our laundry room, but it turned out I was worried over nothing.
- Would it lose its stick when I tried to reposition it? Happily, it was just as sticky if I peeled it off ten times as when I first started.
- Would it be difficult to smooth out bubbles or creases? It had a nice thickness, so there were no issues at all!
- WIll it hold up with humidity? This laundry room gets super humid when the dryer is running. (Ugh, I think there is a leak in the vent to outside.) I installed the peel and stick wallpaper about 12 months ago now…. and there have been zero issues from moisture. You could confidently install this wallpaper in a steamy bathroom.
Although I went into the process a bit sceptical, I wholeheartedly love how this wall came out! Now, I’m excited to think where else I might use peel and stick wallpaper in our home.
Installing Peel and Stick Wallpaper
You don’t need many supplies to install this wallpaper, but having a few things on hand will make the install quick and easy.
Supplies
- wallpaper (I used this one!)
- cleaning rag
- level
- pencil
- scissors
- utility knife or exacto knife
- smoothing tool (or plastic putty knife)
I posted the in-depth tutorial below, however I also created this short video describing the install process.
1. Clean the Wall
First, give your wall a good wipe down with a damp rag and allow it to dry. This will ensure that the adhesive grips well.

2. Measure and Mark
Using a level, measure and mark a straight line down the wall as a guide to ensure the wallpaper lines up straight. The wallpaper is 20.5 inches wide, so I marked my line 20 inches from the corner. The little bit of extra allows for the wall not being completely plumb.

3. Installing Peel and Stick Wallpaper
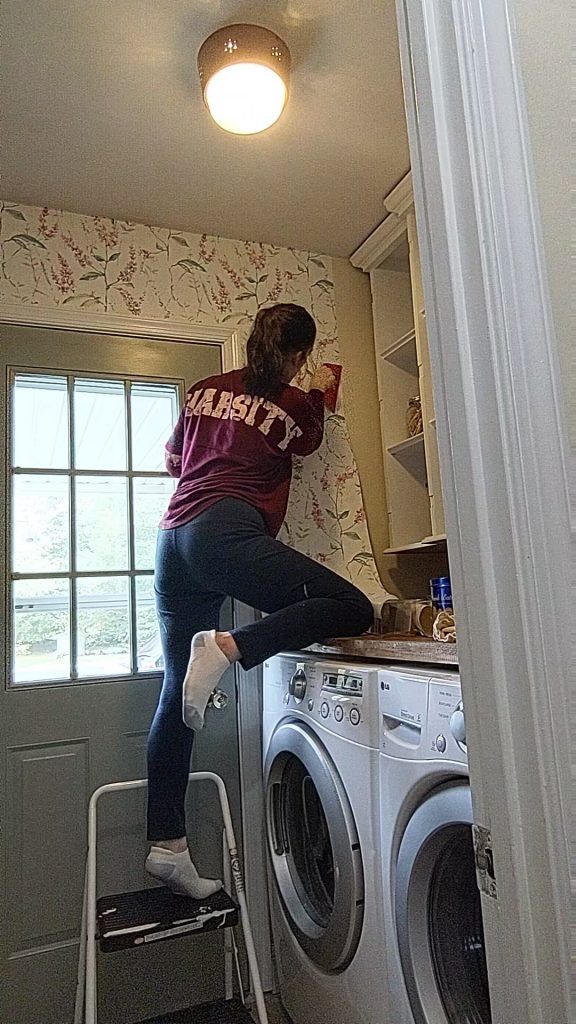
Starting at the top corner, peel off about six to eight inches of the adhesive backing, allowing it to hang downward. Position the wallpaper in the corner, lining up the edge against the straight pencil line you created.
Smooth down the wallpaper once it is aligned, It is totally okay if you have a bit of extra at the top and on the corner edge, as most walls are not absolutely straight. You can cut off the excess once you have it positioned just right.
Once the top few inches are positioned properly, pull the backing downward to expose more adhesive and smooth it down and outward to remove any bubbles.
Continue peeling this way in small sections, and smoothing down the wall. To smooth it out, I use this wallpaper smoothing tool, but a plastic putty knife would also work well.
For each new row, line up the pattern. Continue pulling back in small sections and smoothing down in the same way.
How careful you need to be lining joins in the pattern will depend on the wallpaper design.
The floral pattern I’m using has a lot of variety, so if things are not lined up exactly in some places, it’s not noticeable. This made it easier to use all of the paper without any waste.
Cutting the Edges
For wall switch locations, I smoothed the wallpaper down and created a small crease where I needed to cut. This made it easy to create the opening with the exacto knife. Since the lightswitch and outlet covers will hide the cuts, there is no pressure to get the switch cuts perfect.
At the bottom of each row, I used an exacto knife to cut the paper at the trim. I did the same for the corners of the wall and ceiling.

Here, the wallpaper install was just about finished, and I was feeling very excited about how big of a difference it made!
I was able to complete this small accent wall using one roll of wallpaper. Thank goodness too, because one roll is all I planned on to stick with my $100 remodel budget!

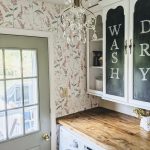
Once I completed the wallpaper install, I replaced the lightswitch and outlet covers, and finished installing the doors on the china cabinet top.
This wallpaper was a fun and affordable way to add personality to our laundry room. I am such a lover of florals. With this pretty pink paper, I feel like this little room is so “me”. Never would have thought the laundry room could be my favorite room in the house…but it is now!
Have you tried peel and stick wallpaper? I would love to hear about it!
For more details on this $100 Laundry Makeover, take a look at the posts below!