It’s week two of our laundry room makeover for the $100 room challenge. This week, I started refinishing the hutch top, and we built a simple DIY butcher block countertop for the laundry room.
I am pleasantly surprised how well this countertop turned out. I am excited to share the process!

It all started with “paint grade” panels we picked up a couple months ago at Lowe’s.
We bought four of them to use for a backyard party. We put them on top of sawhorses… and voila, instant dining tables!
Lowe’s has several widths and lengths, as well as paint and stain grade quality options. The ones we purchased were 16 inches wide and 6 feet long. Each panel was 16 dollars.
The way the panels are made, the glued wood pattern looks similar to butcher block. Although they are only about one inch thick, I started thinking they might make a nice low budget countertop.
So, I planned to use two of the panels together and make a simple top for the washer and dryer. Even if we didn’t already have these panels in the shed, it is a pretty affordable solution. With military discount, it was about $30 for two.
After taking some measurements, we started cutting! The countertop area for the laundry room is 30 1/8″ x 61″.
So, first we had to cut the 6 foot boards to 61″ length. Then, we needed to rip about 2″ off one of the boards to get the 30 1 /8″ total width.
We used a circular saw to cut the wood, along with this magical tool that basically turns your circular saw into a table saw.

It is called a Kreg Rip-Cut Cicular Saw Guide. We just don’t have storage room for a table saw, so I seriously could not manage without this thing! It makes it so much easier to make long precision cuts.
We set the width for each cut, and it guides the wood along straight so you get the perfect smooth cut edge.

As we cut the pieces to size, Jason had an idea.
Since we had the four panels, he decided to cut the other two as well, and glue them sandwiched together to make a thicker countertop.
After cutting the other two boards, he used wood glue to bond them. We applied it to the seams between the panels, as well as over the surface of the panels to bond them together. We glued the panels staggered, so the seams would be at different points on each side of the butcher block.

Then, we clamped the two boards together with every clamp we had in the house. We used metal brackets to strengthen the seam at the bottom.

While the glue was drying, we stacked patio pavers, bags of play sand… random very heavy things on top to keep the boards from flexing.
The next morning, we brought it into the garage to sand and stain. I am so happy, the glue worked perfectly!
The seam along the top where the two boards are joined is very slightly visible, but it is not noticeable.
Note: If I had more time away from my toddler, I would have liked to apply some wood filler over the seam, as well as the the whole surface just to smooth out the appearance of the knots in the pine.
With that step added before sanding, I honestly think this would look exactly like a real butcher block island top!
I sanded the top and front edge briefly with a palm sander to remove a small patch of wood glue and smooth out any rough spots.

The stain I used is Minwax Antique Walnut. I tested every stain I could find in the shed to see what it would look like on the scrap piece.

Antique walnut was the clear winner. Isn’t it fascinating how completely different a stain color can look on different kinds of wood?!
It took two coats of the stain to get a color I liked. It looks incredibly orange in this photo, as the garage lighting is dreadful! After the stain dried, it was time for sealer.

The sealer I used is General Finishes Wood Bowl Finish. This finish is incredible on butcher block! It wipes on in just a few minutes, and dries non toxic within 24 hours. I have used it for a few projects around the house (like the butcher block island packing table), so I already had some on hand!

I just wiped the finish on with a sock rag. The next day, I applied a second coat. It gives the wood a perfect amount of shine.

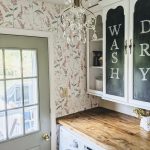
To mount our new countertop, Jason used the 2″ boards we cut off with the circular saw. He attached them to the wall into the studs, using a level to ensure they went up straight. This creates a simple “shelf” for the butcher block to sit on.

We laid our new countertop onto the supports, and I am so excited about it!
Since we used all four of the panels we had in the shed, this DIY butcher block countertop was $60 in wood…which is quite a bit of money!
But, to buy an actual butcher block counter that would fit the washer dryer area, we would need an island size slab…and they can be pricey!

I feel like this was a good way to make the most of what we had, and get the butcher block look for less money!
I can’t wait to update this post with more photos once our laundry room makeover is complete!
Update: Our laundry room makeover is complete! You can read all about it here!

Other Progress This Week
Besides, assembling this countertop, we worked on a few other things this week! I was able to prep and prime the hutch, and apply a couple coats of paint.
The tarnished hardware shined up to a gorgeous color with a bit of scrubbing with a scotchbrite pad.

I also found a small gold chandelier on Marketplace for $25, and I can’t wait to install it!

On the down side, we accidentally gouged the wall installing the countertop. That was no fun! I will have to repair that this week.
Originally, I was considering chalkboard paint on a couple of the doors. Once we picked it up, I realized the glass has some curve in it. I’m not exactly sure how the chalkboard paint would look on slightly wavy glass…so I am wondering if I should scrap the chalkboard paint idea to be on the safe side?
The Budget so Far
- Hutch: FREE on Marketplace
- Primer FREE from the basement
- Paint: $2.50 oops paint
- Foam Rollers/ brush: FREE (already had on hand)
- Brackets: $5.76
- Wood: FREE
- Light Fixture: $25.00
- Stain: FREE from shed
- Wood Bowl Finish: FREE from basement
- Scotch Brite: FREE from kitchen
Total so far: $33.26
Click below to check out the other weeks of this makeover.
Be sure to check out what the other ladies are working on for the $100 room challenge! There is plenty of amazing inspiration!
Week 1 Week 2 Week 3 Week 4 Week 5
Update: Our laundry room makeover is complete! You can read all about it here!


Love it! Great progress!!
This countertop came together so well. Love the bulk that is made from off the shelf supplies. Nice job
Great buy on the butcher block it’s going to look amazing, I love the look of butcher block got counters
Your counter looks amazing! I love the stain color you ended up with. This laundry room is going to be absolutely stunning! I cannot wait to see it on reveal day!