This week, I am so happy to share a fun Dollar Tree decor craft idea!
This craft is one of those incredibly simple things that I am just too excited about. I love it when one of my crazy ideas actually works!

I wanted to have a cute farmhouse themed sign for the bathroom. But, when renovating a bathroom on a $100 budget, there isn’t much money for accessories.
At first, I was thinking I would grab a small frame at the Dollar Tree and find a fun printable. But, then I found this sign, and I had an idea! The wood outer frame feels durable…time to get crafty. Post may contain affiliate links.

I came home and grabbed some paint sticks and found a free bathroom decor printable. (Am I the only one that has several paint sticks floating around their garage?) I used this printable from MeganMoonLoves and used Microsoft Paint to reduce the size to 65 percent so it would fit the sign perfectly.

The paint sticks easily cut to size with a utility knife. I stained them with some leftover stain I found in the shed.

Next, I cut out the printable to fit. Using modpodge, I glued it onto the Dollar Tree sign. I also added a bit to the top to smooth it out and make it durable.

Next, I took the stained paint stick pieces and hot glued them to the sides of the sign. I put them flush against the bottom, so the extra width sticks up around the sign like a small frame.

I love how this turned out, I think it looks just like I bought it at Hobby Lobby!
The ready-made printable was my shortcut method. But, I think you could totally make this sign a few different ways. If I do this again, I want to try spray painting the top of the sign white and using the pencil and sharpie method to make whatever text I want! You can see what I mean with this sign tutorial.
$100 Room Challenge Week 3 Update:
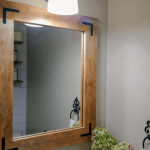
This week, I finished the drywall repairs and primed walls. The first coat of paint is up, and some of the shiplap is nailed into place.
I had some primer leftover from another room, and I found a can of oops paint for $9 during the Labor Day sale. Lowe’s surprisingly still gave me the $15 mail in rebate on the oops paint! So, I didn’t spend a thing on the powder room paint. The paint looks a lot darker on the walls than it looked in the can…but it is a huge improvement over the old wallpaper.

I spent a ton of the budget this week in preparation for next week…I wonder what will be left after I add it all up!
So far, here is what we’ve spent on the $100 Room Challenge:
- Rustoleum Tub and Tile Kit: $23.68
- Spackle:
$7.45$13.03 (We needed even more!) - Shiplap: $26.93
- Wood from the Restore: $.60
- Wood for shelves: $9.38
- Paint brush: $1.00
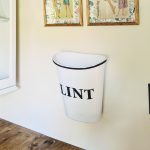
- Basket: $1.00
- Sign: $1.00
- Finish Nails: $2.03
- Glass Cutting tool: $3.36 (we had one, but can’t find it anywhere, ugh!)
- Shelf brackets: $9.10
- Paint: $-6.00
Total: $91.11 ($85.11 if you count the $6 paint bonus)
Wowee, that all added up! Hopefully, I already purchased everything we need!
Check out the other weeks of this challenge below!
Many incredible bloggers are transforming spaces for this challenge. See the link up below for some amazing inspiration!


Pingback: How to Paint the Bathroom Sink, $100 Room Challenge Week 2 - Joyfully Treasured
Oh my gosh!!! What a thrifty idea!!! I am totally going to try this!!
Cute sign! The paint stick frame is an idea I might just have to copy 😉 And better than free paint – how awesome is that?!
Looking forward to the big reveal!
The sign is awesome. My hubs is the same about crafting. But they do so many other things for us, I cannot complain. Looking forward to the full photo!
This sign is so cute! It’s going to be the perfect touch for your bathroom. Can’t wait to see how it all comes together!
Great idea! I’ve been searching for the perfect bathroom sign, but they don’t seem to fit my vibe! I love it!
Pingback: $100 Room Challenge: Powder Room Reveal - Joyfully Treasured
Pingback: Farmhouse Shelves Above the Toilet (for less than $20!) - Joyfully Treasured
Too cute! And clever!