This budget friendly powder room makeover came together with beadboard wallpaper, classic blue and white toile wallpaper, and affordable updates from Lowe’s. See before & after photos, DIY installation tips, and our full source list!
Welcome to our tiny powder room makeover! This space badly needed a refresh, and I wanted to give it a classic, antique cottage look without spending a fortune!
We brightened the tiny room with peel and stick blue and white toile wallpaper, added pre-pasted beadboard wallpaper on the lower half, and upgraded the essentials with affordable finds, including the toilet, mirror, and trim materials.

In this post, I’m sharing:
- Before & after photos
- Exactly what we used (all budget-friendly!)
- How we installed beadboard wallpaper
- How it holds up in a bathroom
- The total cost & a full source list
If you’re planning your own small bathroom makeover on a budget, I hope this helps with a little bit of inspiration, and some practical tips!
Before & After Powder Room Makeover
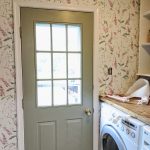
The $100 room makeover on this powder room 6 years ago was feeling worn out, and I was excited for a change! The paint was worn, the toilet was vintage bisque, and the painted sink needed a touch-up.
This tiny powder room is one of those spaces where it feels fun to take a little design risk. Because it’s small and tucked away, it’s the perfect place to lean into pattern and personality without worrying about it overwhelming the rest of the house. When I started thinking about how I wanted this room to feel, fresh, charming, and a little European-I knew wallpaper was going to be the star of the makeover! Picking the wallpaper set the tone for every other choice that followed.
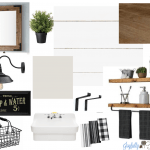
The Design Details
Blue and White Peel and Stick Toile Wallpaper
I loved this blue toile so much for it’s instant French cottage charm, and it pairs so beautifully with beadboard. It really brightened this tiny windowless space, Because the room is so small, it wasn’t an overwhelming task to install it! To line up patterns in space, I used two rolls of toile wallpaper for the half wall above the beadboard.

Installing Beadboard Wallpaper
I learned a lot researching and installing the beadboard wallpaper, so I wanted to include this mini install tutorial with everything I learned! I think this is a great way to easily add detail on a budget. It looks surprisingly realistic once painted, can be cut to fit any sort of odd shaped area, and costs a fraction of real wood paneling.
Why We Chose It: It is an affordable alternative to wood beadboard, not to mention the faster installation-no saws or power tools needed. I completed this wallpaper install while my husband was away for work, so wallpaper made it that much easier to install solo. I did not want to remove the baseboard, and also wasn’t ready to replace the sink in this bathroom, so the beadboard wallpaper made it so easy to cut around weird shaped and curved areas. I was a little concerned reading a few of the reviews on it, but I actually love this stuff, and plan to use it again in our hallway! It really adds a ton of charm for a small price!
Purchasing your beadboard wallpaper: At first, I was going to buy a more expensive brand of wallpaper from Lowe’s online. However after doing some research online and visiting Lowes in store, I learned that the more affordable Allen & Roth brand is virtually identical!
How to Install It (Quick Guide)
1. Measure the height you want for the beadboard section and mark a level line around the room.
2. Cut the wallpaper panels to size. The visible portion of our beadboard from baseboard to chair rail is about 36″. I went with two inches more than the exact size I wanted, to allow for the likely lack of square in the walls of our old house and overlap under the chair rail. Our baseboards are 6″, so this made our wainscoting 42″ high.
3. Wet the wallpaper. After a lot of research, I did this a little differently than the directions stated and it made it so much easier! Rather than submerging the pre-pasted wallpaper, I laid it on the floor face down and filled a spray bottle. I sprayed the back with water until it was well coated and gently folded it over for a minute or so to ensure the glue is activated. I also lightly sprayed the wall before sliding the wallpaper into place. This helped the wallpaper stay durable and maneuverable, as wetting the front side seemed to cause it to tear more easily according to reviews.

4. Line up the panels one at a time and press firmly, smoothing as you go. I used a felt lined smoothing tool for this to prevent any damage to the wallpaper while it is damp. Excess glue will often come out the seams as you smooth so just gently wipe this away.

5. Match the grooves so it looks seamless. I was worried this part would be tricky but lining it up was so easy because it slides slightly on the wall to get into place before smoothing it snug. I found it way easier than lining up peel and stick!
6. Use a sharp blade to trim edges around outlets and corners. I waited for it to dry slightly before cutting. A sharp knife makes this easier. Be patient when cutting through the textured pattern. I found it easier to cut lightly first to break the top textured part before going over again with a deeper slice.

7. Caulk the seams for a finished look. Any tiny flaws from cutting will be completely covered by the caulk. The caulk is an important step for beadboard wallpaper, it made everything look polished!
8. Paint the wallpaper to make it look like real paneling. I also think this finishing step is important! I want to go over ours with one more coat, but even the quick coat of white paint I added made it look polished! I think the trick with beadboard wallpaper is to think of it more like a beadboard install than a wallpaper install. That way you paint and caulk to get that real bead board look!
FAQ: Does It Hold Up in Bathrooms?
Yes, it holds up beautifully as long as you seal and paint it. I ultimately want to go over ours with this enamel cabinet paint from Lowes to give it that hard, wipeable finish.
Adding Trim for a Built-In Look
Adding trim on top of where the top wallpaper met the beadboard wallpaper really polished it off and made it look like real deal. I used a small affordable chair rail from Lowe’s and a small tube of caulk to seal the gaps and seams.
Installing the New Toilet & Mirror
A new toilet and mirror immediately updated everything and made it feel fresh and polished. Our old almond color toilet with a broken seat was just not the vibe!
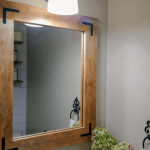
I loved this mirror from Allen + Roth because it has a beautiful shape, and a nice understated gold frame. I felt like it looked beautiful without detracting from the blue toile wallpaper.
The existing light fixture got a quick update with some gold rub n buff and an affordable new glass shade from Lowe’s.

Shelving Wall Update
This is where everything came together and felt complete!
I had the paint color matched from the blue in the wallpaper. It’s a touch darker than I was imagining, but I still love it and now that it’s all finished!

For the shelving, I just styled it with everything things we use in the bathroom, along with a couple Dollar Tree frames and one that I already had! The large ornate one was actually a Dollar Tree mirror, but I took the mirror out and then inserted the print. The match jar is a little thrift find and I glued the striker from the box of matches to the bottom, and the candle striker is another Dollar Tree find!
The towel bar candle holder was a fun Amazon find!

Supplies We Used
Here’s everything we used to update our powder room!
- Toilet (Lowe’s)
- Mirror (Lowe’s)
- Toile Wallpaper
- Beadboard wallpaper
- Chair rail
- Shelving Trim
- Painter’s tape
- Caulk
- Paint + stain
- Shelf Rail Connectors
- Foam paint roller
- Shelf brackets
I was able to use some paint, stain, and caulk from other projects. All in, this bathroom makeover came in right at $500.
FAQs About Beadboard Wallpaper & Small Bathroom Makeovers
Does beadboard wallpaper look real? Yes! Once painted, it looks surprisingly close to real beadboard.
Is beadboard wallpaper cheaper than wood? Significantly. It’s one of the most budget-friendly ways to add charm!
Can you use beadboard wallpaper in a bathroom? Absolutely, just seal and paint it properly.
How long does installation take? You can easily finish the wallpaper install in an afternoon, depending on the size of your space. Allow to fully dry before caulking and painting!