With the best intentions, I hang the kid’s beautiful pictures on the fridge…only to have them fall off every time I open the door, or be pulled off and ripped up by the kids. Is anyone else with me in this?
I have been meaning to find a special (and tidier) way to showcase the kids art, and this kids art display wall in the playroom is a good start!

With just a few simple materials, this kids art wall display, and this DIY playroom chalkboard are both great playroom ideas on a budget. The best part is, they were both simple projects, taking about 30 minutes to complete!
Kids Art Display Supplies
- Furring strip, or any plank of wood works
- wood stain (I used dark walnut)
- metal clips (amazon actually has them already in black!)
- finishing nails
- black spray paint
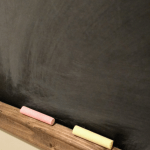
To make this art display, I used a furring strip. A wood furring strip is only about a dollar at Lowe’s. Some have imperfections, so I just sort through and pick out a straight one that will stain nicely.

These are 8 feet long, so you can really make it as long as you need! I asked Lowes to cut mine down to four feet to match the width of our DIY chalkboard.
Next, I just added a quick coat of dark walnut stain that we already had at home from another project.

I purchased a couple 4 packs of metal fridge clips at Dollar Tree.
Of course, after I picked them up, I realized I could have just purchased a whole pack of affordable black metal clips.
Then, I could have skipped the spray paint step… especially since I want to make more art holders in the kids rooms and family room! That will be my plan for next time.
I spray painted the silver clips using the same flat black spray paint that I used in our $100 bathroom remodel. That one can has helped with so many little projects! I’m also spray painting the letters READ for another wall!

Now, to add these clips, I was planning on small nails, but I ended up using an adhesive caulk. It was just easier for me at the time with the kids playing a few feet away, but both methods work.
Space the clips evenly along the length of the board, figuring out how you want to arrange them before gluing. I placed the first two clips near each edge, then worked my way in, using some of his artwork to decide how far apart would look nice.
Once the glue was set a little while later, I just used a couple finishing nails to tack this into the wall. You might also add a couple simple picture hangers to the back to hang it.

This kids art wall display was just what we needed. It was so affordable, and his artwork looks beautiful up on the wall above the contact paper chalkboard.
It’s so simple to display it this way. In this season of motherhood, I definitely need things to be simple!

We are having fun transforming our mostly unfinished basement into a play area. This basement has come a long way from the musty dungeon it was!
Next, I think I’d like to add a butcher paper roll to this wall. Does anyone have any other fun play area ideas?

Pingback: Kids Chalkboard Wall, Easy DIY Schoolhouse Chalkboard with Contact Paper - Joyfully Treasured