Painting over semi gloss requires a little preparation but it’s really simple. Since we are gradually painting our entire house, I thought sharing our experiences might be helpful.
It is important to prepare the surface well when painting over semi gloss, or it can sometimes mean way more work in the long run. (I learned all about this the HARD way!)
When we purchased our home, we were so happy that much of the house had been freshly painted to get it sold. After we were moved in just a couple weeks, we realized all the paint was cracking and leaving alligatoring on the walls. In the bathrooms, the paint fell off the walls completely. We noticed it was a flat paint over semi gloss, and it became clear that the walls were not adequately primed or prepped.
Weirdly, In our former home, I painted semi-gloss over semi-gloss without prepping a couple times with no issues!
Now I always prime to be safe. I think the age of the paint might be a factor. Being thorough with prep every time is WAY easier than repairing a peeling, flaking mess!
Preparation Methods for Painting over Semi Gloss Surfaces:
- Deglosser is an option, but the fumes can be dangerous so I only like to use it outdoors.
- Sanding to remove gloss: I hate thoroughly sanding, so I just don’t unless it’s really necessary because of roughness.
- A high quality gripping primer.
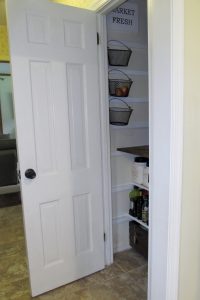
Since our home is older with a track record of peeling and paint texture issues, I use a high quality latex gripping primer with great results called Zinnser Bullseye 123. I used it here to paint this off yellow six panel interior door to finish up the pantry makeover.

If you are dealing with repairing where paint peeled or alligatored, Kilz Original or BIN are always foolproof too. Unfortunately, the fumes are a lot stronger with these oil based primers and there is more cleanup required. I didn’t want to have the strong fumes in the house with Wesley playing in the next room.
NOTE: If your current paint is oil based, you will need to use the oil based primer, such as Kilz or BIN, before painting with a latex paint. A great way to check if you are uncertain: rub isopropyl alcohol on a small spot with a cotton ball. If some paint color comes off onto the cotton ball, you have latex. If not, your paint is an oil based, or possibly lead based in an older home.
Supplies Needed:
- Zinnser Bulls Eye 123
- Wood Filler
- Sand paper
- Paintbrush (love this brush!)
- Foam Roller Kit
- Your Desired Paint
- new doorknob if needed
The Process:
Step 1: When painting over semi gloss doors, first give the door a good scrub with a degreasing cleaner.
Step 2: Patch screw holes and imperfections with wood filler as needed. My door was full of screw holes. Applying two coats of wood filler is usually necessary because it shrinks as it dries. After the wood filler dries, give the rough spots that were filled a light sand until they are smooth. Wipe with a clean, dry cloth. If your door is in good shape, no filling or sanding is necessary.

Step 3: Remove the door knob, and tape off hinges. You COULD remove the doors and paint them laying flat, but I didn’t. I like to maximize nap times, and the foam roller helps with preventing drips and brush marks.


Step 4: Apply a coat of the 123 primer. A small brush is best to paint the door trim and bevel areas of a six panel door, and a foam roller to paint the flat areas. One coat of primer is sufficient to ensure good adherence.

Update: I have done a ton of painting the past few years, and I love the wooster shortcut brush to cut corners precisely without taping! I added a few updated photos of a more recent door project.

I try to start with the bevel first, then I fill in the center panel areas.

Then I use the roller to paint the flat surfaces. I paint the horizontal portions of the door, and lastly I paint the long vertical parts of the door.
Step 5: After the primer has dried, paint again with your desired paint.

I apply the paint to the door again with a foam roller to prevent brush marks on all the flat surfaces. Recoat as needed after each coat has time to dry completely.
In between coats, I use plastic wrap and a sandwich bag to store my roller and brush. It will stay wet for weeks stored this way!
Now I have painted one more small piece of the house, and the pantry door is ready for some wood spice racks!

I’m happy to have a simple method for painting over semi gloss doors…because I have lots more to paint! As long as it will still turn out well, I like to keep things as simple as possible!

I obsessively researched and talked with several pros after our crazy cracked, peeling paint situation…so if you are dealing with alligatoring walls or peeling paint, I FEEL your pain!
Have you ever had peeling issues after painting? Do you have any tips to share?
Pingback: Wood Pantry Door Spice Rack from Ikea, and the Pantry is finished! - Joyfully Treasured