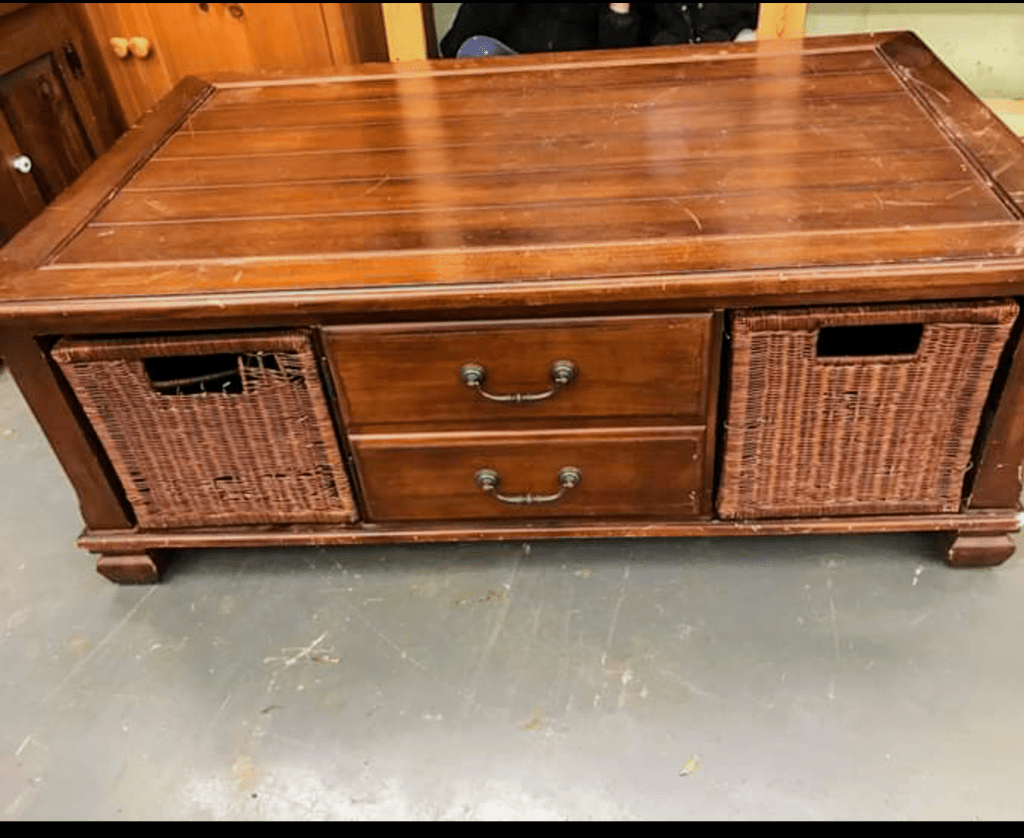
It is so rewarding to find a gorgeous piece of furniture with “good bones” that has seen better days, and give it a beautiful transformation. I stumbled upon such a perfect coffee table on Facebook Marketplace. I am excited to share this makeover!
It often happens this way…I’m not exactly looking for furniture, but it calls to me from the thrift store or the side of the road. Don’t you just love those moments?
Or, in this case, it popped up virtually in my suggested items for just $10…and I needed it.
My new weekend plans were to refinish a table top and paint this beauty!
The tricky part of this table makeover was I wanted to lighten the wood top. So, I couldn’t just throw on some gel stain and darken it in my usual low effort fashion.
To get a light finish, it would involve… stripping. *insert audible sigh here*
Honestly, I made mountains out of molehills. It wasn’t bad at all, especially once I figured out what worked best! Post may contain affiliate links.
Take a look at this rags to riches story:

Because of all the grooves and beveled areas, sanding would not be effective. So, I used Citristrip to refinish the top. I love that it is safer to work with than most, and it doesn’t have an offensive smell.
I used a few basic supplies on this table. Luckily, I had nearly all of the materials on hand from past furniture projects!
Supplies
Tabletop Refinishing Supplies
- Rags
- Citristrip
- Metal putty knife
- Steel wool (course and fine)
- Mineral spirits
- Stain color of choice
- Polyurethane
Paint Supplies
- Angled paint brush
- 4 inch Foam roller
- Gripping primer
- Latex paint
- Flat black spray paint
How to Refinish a Tabletop
I started with the top first. Since Citristrip is gooey when you scrape it off, you do not want that near a new paint job!
First, Use a rag, and wipe on globs of the Citristrip. It works the best when I lay it on thick.

Then let it sit…for a couple hours to penetrate the finish. I should have taken a picture of the Citripstrip sitting on the surface…I stripped another painted piece around the same time, here is what it looked like once it was coated.

Knowing I wanted a distressed, rustic finish made it that much easier to strip!
When it came time to strip, I used a metal putty knife. I went to work scraping of the finish without being too careful. Gouges and chips in the wood just add character!
Note: If you want to keep your top in pristine shape, use a plastic scraper. Be careful not to use excessive force, just let the Citristrip do the hard work!
Right after scraping, things were looking very grimy and gooey…and I was wondering what I got myself into. Don’t panic!
Steel wool will remove much of the loose goop and take off most of the loose finish from the crannies and grooves. Wipe off with a rag.
After scrubbing the loose layers of finish, it was obvious what areas needed a bit more stripping.
All of the top varnish came off, as well as a lot of the wood stain in the first coat. But, there were still several patches of stain that were not removed.
So I repeated the process, adding one more coat of Citristrip where needed, and scraping after a couple hours.

Scrub with steel wool going with the grain, and wipe as needed with a rag. Use a finer steel wool to smooth everything out. Thoroughly wipe any remaining Citristrip residue with the mineral spirits and a clean rag.

This a satisfying step, because it dissolves and cleans everything up nicely. This is the part where I finally stopped worrying I was missing something! It conditions and smooths everything out and you suddenly have a table top ready to seal or stain!
Now that the surface is prepared, it is time to protect your hard work! I used one coat of Minwax Early American stain. Once it dried, I followed up with satin polyurethane.
Painting the Base
Before painting, I took a scrubber and gave the base of the coffee table a good cleaning with a degreaser.
Then, I removed the doors and hinges, and set them aside on a drop cloth. I laid them out on top of a couple scrap boards, so the edges of the doors would not be touching the drop cloth.
Once the table was thoroughly dry, I started with a coat of gripping primer. For this table, I used Bullseye 123, as I had some left over from another project.

Applying the primer with a foam roller works well to minimize brush strokes. Then, I went in with the brush in the corners and crannies that the roller could not reach. I also rolled the paint on the doors, flipping between each coat.

Here is the coffee table after the primer coat. It is already looking great, how exciting!

Next, I followed up with two coats of latex in the color Sherwin Williams Alabaster. I used the leftover paint from the laminate office furniture makeover.
I applied it like the primer coat. Using a foam roller, and a small angled brush in the corners.
It took a little longer for the doors to be finished, since I had to flip between coats. I have learned to wait at least a few days to put the doors back on a piece. That way, the paint has a little time to cure, and I wont accidentally gouge my new paint job!
While I was finishing the doors up, I went ahead and spray painted the hardware with some flat black spray paint.

Now for the best part, putting it all back together! I am in love with the new rustic table top. This may be my favorite yard sale find to date.
It actually looked just as nice without the center doors mounted, but we need that space baby proofed.
It is an ideal spot to hold all the board games! I am happy they are now tucked away, and no longer teetering precariously at the top of the coat closet.

IKEA cube baskets were the perfect replacements for the broken storage bins, and hold all the baby toys out of site. All this new storage space is just what our family room needed right now.
Do you love a good furniture makeover? I know I can’t get enough!
Here are a few others you might enjoy!
- Painting over Laminate Bookcases
- Painting Wicker Chairs and a Milk Can Table
- Gel Stain Console Table Makeover
- Painting Upholstered Fabric on Chairs
Do you have any furniture makeover ideas to share? I’d love to know about it! Share or link them below!